- Home
- universal labor and delivery
- Management of Spontaneous Vaginal Delivery - Gynecology and Obstetrics - Merck Manuals Professional Edition
Management of Spontaneous Vaginal Delivery - Gynecology and Obstetrics - Merck Manuals Professional Edition
4.6 (774) · $ 27.00 · In stock

Management of Spontaneous Vaginal Delivery - Explore from the Merck Manuals - Medical Professional Version.
Women in maternities around the world most often give birth lying flat on their backs. This is a familiar position and convenient for the birth attendant, however there are alternative positions that are more effective for birthing women. This video shows a variety of birthing positions to give women choices.
These positions help the normal natural process of birth and support a woman’s pushing efforts. Lying on her back can hinder the woman’s pushing efforts, reduce oxygen to the baby, and slow down the birth. Encourage different positions for giving birth, but if the woman prefers to lie on her back, suggest she raise her head to help her pushing efforts; or, better, help her to raise her upper body. Women who choose other birthing positions may give birth more quickly and easily.
Let’s see some examples.
Here the woman is sitting up in the bed, supported by her partner behind her. This position is comfortable for many women, and makes it easy to see the progress of the birth. Support the perineum as you keep the head flexed, then guide the slow birth of the baby’s head. Once the baby rotates, assist the birth of the shoulders.
In this next example, the woman is lying on her side. This position is restful yet allows contractions to remain strong and powerful. It relaxes the perineum and may help prevent tears. The woman can have her companion help support her leg or she may hold her leg by herself. In a side lying position, as in all other positions, support the perineum as you keep the baby’s head flexed; then let the head slowly birth. As the baby rotates, the shoulders come on their own.
Upright positions, such as squatting, are very effective in bringing the baby down. The uterus often contracts more effectively plus gravity helps the baby move more easily through the pelvis. The pelvic opening also becomes wider in upright positions. Here the midwife keeps her hand on the baby’s head to monitor progress. Just as the head comes, the woman chooses to lie back. A woman’s legs may tire quickly if she’s not used to squatting. Here the woman supports herself with bars that are attached to the birthing bed. The baby’s head slowly emerges, then the top shoulder; and the bottom shoulder. The baby is born. This woman is in a squatting position supported by the back of the bed. With a few effective pushes, the baby is born.
Hands and knees, another upright position, is a favorite position of many women and is helpful when the woman feels her labor in her back. The perineum will often naturally stretch which can prevent tears. The woman cannot see your face – so talk to her often to let her know her progress. Checking the baby’s heart rate is easiest with a doppler or a stethoscope. Wipe away any fecal material that may appear while she’s pushing. Support the perineum and apply light pressure on the back of the baby’s head to keep it flexed. Remember, the birth movements will be the opposite of the way they appear when the woman is on her back. The baby’s face will be looking at the ceiling when it appears. The next contraction brings the baby. Support her as she’s born, then dry her on the blanket at the feet of the mother. Pass the baby through the mother’s legs with her cord intact. The mother then turns over and rests with her baby skin to skin. Keep in mind that the hands and knees position increases the room in the pelvis and is one of the maneuvers to try if a baby’s shoulders are tight.
This woman is pushing very effectively in this half kneeling position. As with the hands and knees position, you’ll need to be behind the woman to catch the baby. After the baby rotates, assist the shoulders to deliver, one and then the other. Encourage women in your care to try different positions. You will gain confidence in your ability to support a woman’s choice in how she’ll give birth. Often she will find the most comfortable position for herself, which is also the one that helps her push most effectively.
Remember, active upright positions help the natural process of birth. Upright positions can help bring the baby out when the birth is slow. Demonstrate and encourage different positions during birth.
Keep equipment within easy reach.
Before encouraging the mother to push, do a digital examination to be certain that the cervix is fully dilated. At the same time, feel the fetal suture lines and fontanelles to assess fetal position and thus, the suitability of vaginal delivery.
Before delivery, put on sterile gloves and often a gown, mask and eye shield. Position the patient. The dorsal lithotomy position is desirable because it allows the infant to be pulled below the plane of the mother, which is typically done when the shoulders are delivered.
Although not mandatory, putting a drape underneath the buttocks helps maintain cleanliness. Wipe or pour an antiseptic solution over the perineum.
Now encourage the mother to push during contractions as when straining to pass stool. Encourage the mother to rest between contractions. If epidural anesthesia prevents the mother from feeling contractions, an assistant can feel the uterus or do tocometry to identify them. Eventually, the perineum bulges and the vaginal opening widens to reveal the fetal head.
Before crowning, which is the point at which the introitus surrounds the fetal head at its maximum diameter, press gently against the head. This pressure helps maintain a smooth, controlled rate of delivery and thus decreases the risk of perineal tears. It also helps the fetal head clear the pubic symphysis. Avoid episiotomy whenever possible during routine deliveries.
With further descent, as the head begins to extend, place a toweled hand on the perineum and press upward to keep the infant’s occiput close to the pubic symphysis, and to support the perineum. Apply counterpressure with your opposite hand to help control head extension.
The infant’s head is then delivered and extends slightly. Slide your fingers around the neck to detect any nuchal cord. A nuchal cord should be pulled out and over the occiput. The occiput spontaneously rotates externally after the head is delivered (this is called restitution).
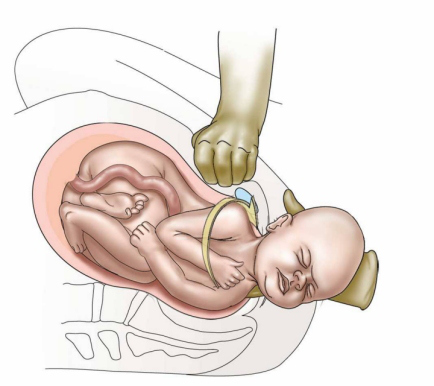
Position your body to comfortably grasp the mandible with both hands. Then pull downward. Stop pulling when the anterior shoulder is delivered from under the pubic symphysis. Make sure to immediately announce any unusual obstruction to delivery of the fetal shoulder so that preparation for shoulder dystocia can begin immediately. After the anterior shoulder is delivered, pull upward to deliver the posterior shoulder. Begin oxytocin infusion.
Next, support the head with your anterior hand and support the infant’s body, maternal perineum, or both, with your posterior hand. The body often delivers spontaneously after the posterior shoulder.
Place 1 clamp about 4 to 5 cm from the umbilicus, strip the cord in a direction away from the umbilicus, and then place a second clamp just distal to the first one. Cut the cord between the 2 clamps. As soon as the airway is accessible, bulb suction the mouth, and then the nose. But don’t delay delivering a distressed fetus to suction. If the infant cries spontaneously at the perineum and did not pass meconium, stimulate the infant--for example, by rubbing the scalp and abdomen.
Twin births may go well, but they can be more difficult and risky than a single birth. This video will show how to assist in the birth of twins and what additional problems to anticipate.
Suspect twins if the fundal height is large; often measuring more than 40 centimeters. The baby’s head may be small relative to the fundal height. The woman may have noticed movement all over her belly and you may hear 2 distinct heart beats.
Many of the complications with twins cannot be predicted before labor begins. If there is time, try to transfer the woman to a higher-level facility for the birth.
Twins are more likely to be born early, and to be small and weak. Twins are more likely to be in a difficult or, even, impossible birth position — for example, breech or side lying. The cord, especially of the second twin, is more likely to drop out early; or prolapse. The placenta of the second twin may start coming off the wall of the uterus after the first twin is born. This can cause dangerous bleeding. If the second twin is not born soon after the first, the uterus may get an infection. The second twin may die in the uterus if the delay is too long. The woman is more likely to bleed heavily after the birth — often with 2 placentas instead of one.
To assist in the birth of twins, monitor the labor the same as for a single baby. Make sure when you check the heart rate that you listen to both of the babies. Have an IV in place in case oxytocin is needed.
Deliver the first baby as you would any single baby. Dry the baby and place him skin to skin on the mother. Cover him with a warm dry blanket, then after a few minutes, clamp and cut the cord. But don’t deliver the placenta until after the second baby is born.
Now turn your attention to the second baby. Check the heart rate. Then do a vaginal exam. If the baby’s head is down and well-engaged in the pelvis, the membranes can be ruptured now if they are intact. Check for cord prolapse. The second baby should be born in 15 to 20 minutes. Deliver her as you would any other baby; then dry her and place her skin to-skin with the mother. After a few minutes cut the second baby’s cord and deliver the placentas.
Here are 4 possible complications you may experience during the birth of twins:
First — the second baby may be breech. Estimate his size. If you feel he’s no larger than the first baby, the cervix is still open, and you are trained in breech deliveries, monitor the labor and manage the delivery.
Next — The second baby may be sideways. If the baby cannot be moved to either a head down or a breech position, keep the woman lying on her side so that the second baby’s cord or arm does not fall into the vagina. The baby will need to be born by a cesarean operation.
Third — contractions may have slowed or stopped after the birth of the first twin. Let the baby breastfeed to encourage labor to start again. If the baby will not breastfeed, show the mother how to massage her nipples. If the second baby has descended, try breaking the waters. If the head or breech is still high, start an oxytocin infusion; increasing carefully to have adequate contractions. Seek advanced care if these methods do not start labor.
And last — the woman may bleed after the birth of the first twin and before the second twin is born. She may have early separation of the placenta. This is very dangerous. You need to get the second baby out as fast as you can: stimulate the nipples, break the bag of waters, try an upright position, and ask the woman to push very hard.
Remember, many of the complications with twins cannot be predicted before labor starts. Clamp and cut the cord after the first twin delivers. The second baby should be born soon after the first, within 15-20 minutes.
After the baby is born and the placenta is out, evaluate the woman for tears. It can be challenging to recognize what tissues are damaged after birth. This video will show how to evaluate tears and how to decide which tears need to be sutured.
Examine for tears. Tears can be hard to see clearly. Use a good light and take your time as you examine each woman. First find the start of the tear, called the apex. This will help you recognize what is torn. Then evaluate how deep the tear is, in the direction of the rectum. This will help you understand the extent of damage to the muscles underneath. The depth can be estimated in fingerwidths. Examine a lot of tears. This is the best way to teach your eyes to see.
Let the woman know you’ll be examining her vagina. Then examine the tear in a systematic way. Using a gentle touch, carefully open the vagina to see how far the tear goes inside. Find the apex. Then, check the depth. Examine the upper part of the vagina and the labia for tears. And last, push the torn sides together to see how they will join.
Here is another example. Gently open the vagina to see the tear. Find the apex. Note the depth of the tear. Examine the upper vagina and labia. And last, see how the tear will come together. If the tear is deep, assess the anal sphincter muscle. The sphincter muscle may be whole and intact, partially torn, or completely torn. Look and feel to assess the tear.
Here the tissue overlying the anal sphincter muscle is smooth and intact. It feels like a firm continuous band of tissue. The muscle tightens together in a circle. If it’s partially torn, you may feel a defect. If it’s completely torn, you may find the ends of the sphincter muscle: One end is here. The other end has retracted and only a round dimple is seen. You will not feel a firm band of tissue. And the muscle cannot tighten in a circle.
With a deep tear, be sure to do a gentle rectal exam to assess the anal sphincter. Palpate the sphincter muscle from 10:00 to 2:00. If it’s not torn, it will feel firm and continuous without any defects. Next, bring your finger up to look for any tears. Notice the smooth intact sphincter muscle. And last, ask the woman to squeeze her anus – you should feel the muscle contract around your finger. Then discard the glove and use a new one. Decide which tears need to be stitched. After examining the tear, share your thoughts with the woman. Decide with her whether to suture the tear or not.
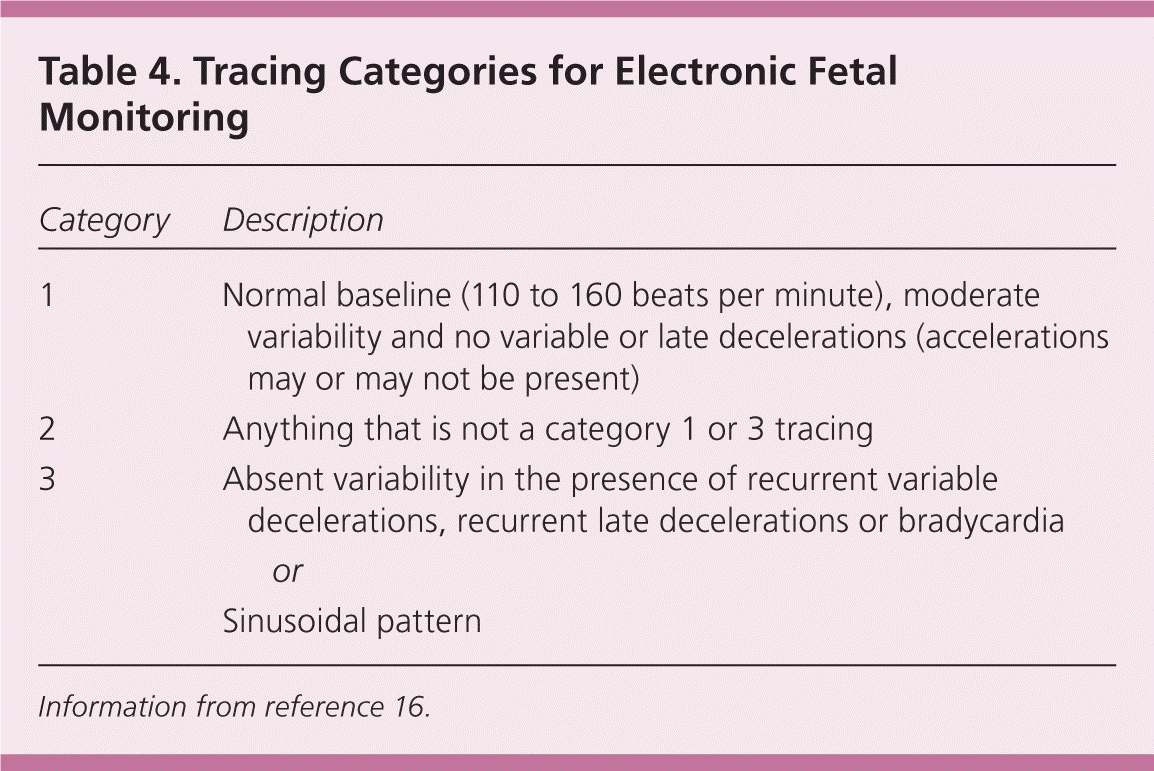
Tears are classified into 4 degrees according to their depth.
A first-degree tear is shallow. It’s less than a finger width deep, doesn’t extend into muscle, and is not bleeding heavily. Small tears may not need to be sewn. They will usually heal well on their own.
A second-degree tear is deeper. The tear is more than one finger width deep, extending into the muscles of the perineum but does not involve the anal sphincter. If it’s sutured it will heal better and restore the tone of the pelvic floor muscles.
A third degree tear extends into the anal sphincter. In this complete third degree tear, we find one end of the muscle here and the other end here; drawn back inside the tissue. Now one end is clamped and the other end is retrieved and then clamped. Third degree tears need to be sewn back together by a skilled clinician.
A fourth degree tear goes through the anal sphincter and the lining of the bowel, into the rectum. Notice the finger inserted into the rectum rises right through the torn tissue demonstrating that the rectum is completely torn.
Third and fourth degree tears must be sewn. The woman can have permanent damage and never be able to hold her stool in again. They are more difficult to repair. If you do not have the experience to repair these tears, be sure to refer the woman to someone with more suturing experience.
Remember, learn how to evaluate tears by examining as many as you can in a systematic way. Gently open the vagina: find the apex, assess the depth, check for upper vaginal and labial tears, and see how the tear goes together. If the tear is deep, be sure to determine whether it involves the anal sphincter.
How To Repair an Episiotomy
A cord around the baby’s neck at birth is a common occurrence. It happens in about a third of all births. This video will show how to manage a tight cord around the neck; including demonstrating a practice known as the somersault maneuver.
Many birth attendants are taught that a cord around the neck at birth needs to be removed or clamped and cut before the baby is born. They worry that the cord will either tighten too much around the neck, or will prevent the birth of the baby, or might pull the placenta off the uterine wall. The biggest risk to the baby is, in fact, clamping and cutting the cord too early – before the baby is born. This action cuts off his supply of oxygen from the placenta. The woman must push hard and get the baby out fast. This is an emergency. Then, you need to be ready to help the baby begin to breathe if necessary.
Let’s see how to manage a cord around the neck safely. If the baby’s cord is loose enough, it can be slid over his body. Or, the cord can be simply left alone. A loose cord around the neck will not get in the way of the descent and delivery of the baby’s body.
Occasionally though a cord is tight – as in this hands and knees birth. Or there are several loops around the neck. Then further descent of the baby’s body may be limited and another approach is needed.
Be sure the baby has rotated, then gently push his head towards the woman’s thigh in the direction the baby is facing. Be sure her legs are wide open. Keep the baby’s head close against the woman’s thigh. A push from the woman brings the baby’s body out as the head stays close to the thigh. Now unwind the loops of cord from around the neck. Then dry the baby and care for him in the usual way.
Here is an example of this maneuver with the woman in a hands and knees position. Again, pause for the baby to rotate. When he isn’t coming easily; a tight cord is discovered. Now gently push the baby’s head towards the woman’s thigh in the direction the baby is facing. Keep his head close against the woman’s thigh as the baby’s body emerges. Then unwind the loop of cord around his neck. This practice prevents the emergency of early cord clamping before the birth of the baby. It’s safe, can be performed no matter how many loops of cord are around the neck, and can be used in any birth position. It also allows for the baby to receive the benefit of delayed cord clamping.
Remember, the biggest risk of a tight cord around the neck is clamping and cutting it too early – before the baby is born. Instead push the baby’s head against the woman’s thigh and keep it close as the baby is born. This safe practice can be used in any birth position.
How to Deliver and Inspect the Placenta
After the birth, the placenta usually delivers within half an hour. Sometimes though, the placenta is delayed or a piece of placenta is left behind in the uterus. Even a small piece can prevent the uterus from contracting and the vessels will continue to bleed. This video will show how to remove a placenta with your hand.
If the placenta is not delivered in 30 minutes and the woman is not bleeding, ask her to try to urinate, give her a second dose of oxytocin, continue controlled cord traction, and encourage her to bear down. Do NOT repeat misoprostol. If the placenta remains inside the uterus after one hour, OR if the placenta has missing pieces OR the woman is bleeding heavily -- remove the placenta or pieces with your hand. Do not delay!
Here the cord breaks. You wait one hour, since the woman is not bleeding, but the placenta fails to come. Tell the woman you will now need to remove her placenta with your hand and why. Ask for her consent. Be sure she has an IV and her bladder is empty. Then give her diazepam 10 milligrams IV – if she is not in shock. Also give her a single dose of antibiotics to prevent infection, either 2 grams of ampicillin IV or 1 gram of cefazolin IV. Then, wash your hands, and put on long, sterile gloves up to your elbows.
With your thumb in your palm and fingers together, carefully insert your flattened hand. Move it gently into the vagina, forward through the cervix and into the uterus. If the cord is present, pull it gently until it is taut and then follow it into the uterus. Now move your hand to the top of the abdomen to support the uterus and keep it in place during removal. The back of your hand will be against the uterine wall. Feel for an edge of the placenta. Then with your fingers tightly together, sweep your hand back and forth to gently separate the placenta from the uterine wall a little at a time. Proceed slowly until the placenta is completely detached. Then hold the placenta in your hand and BRING pull your hand out, gently twisting your wrist back and forth as you come down the birth canal. Hold the placenta in both hands and twist it to bring all the membranes together. Then check if the uterus is well contracted and massage it if it is soft.
If the placenta cannot be easily separated from the uterine wall, do not force it! The placenta could be abnormally attached and the woman may need surgery. Refer her to higher level care right away.
Examine the placenta for completeness. Give oxytocin 20 units in 1 liter of IV fluids at 60 drops per minute. Teach the woman to monitor her uterus and call you if it becomes soft or she feels her bleeding has increased. Monitor her pulse, blood pressure, uterine tone and vaginal bleeding every 15 minutes for two hours, and then every 30 minutes for the next 6 hours or until she’s stable.
Remember, enter the uterus with a flattened hand, thumb in palm and fingers together. Find the edge of the placenta then sweep your fingers back and forth to gently detach it. Remove the whole placenta once it is separated.
After the baby is safely born its time to deliver the placenta. Usually it delivers within half an hour. As the placenta comes out, hold it in both hands and twist it to bring all the membranes together. There should be minimal bleeding that stops quickly. Sometimes though, a piece of placenta is left behind in the uterus. This can lead to continuous bleeding and infection. This video shows how to examine the placenta for any missing pieces.
Let’s first see what happens to the placenta from inside the body: after the baby is born, the uterus contracts and soon after the placenta separates from the wall of the uterus. A clot of blood forms where it has separated. The uterus continues to contract, closing off the bleeding vessels, as the placenta moves down and through the birth canal to deliver. Sometimes though, pieces are left behind in the uterus. Even a small piece can prevent the uterus from contracting and the vessels will continue to bleed. This can lead to hemorrhage or infection.
It’s important to carefully examine the placenta. The smooth and shiny side faced the baby in the uterus. The cord attaches on this side, and then spreads out into many deep-blue blood vessels. The maternal side of the placenta is the rough, red, meaty side that is attached to the wall of the uterus during pregnancy.
To check the placenta for completeness:
Hold the placenta in the palms of your gloved hands, with the maternal side facing upward. Look carefully to be sure that all the lobes are present and fit together. Check the edges of the placenta for torn veins that could indicate extra lobes. There should be no missing piece or sign of breakage when the placenta is stretched flat over your hands. It’s not really necessary to inspect the membranes for missing parts. Usually the body will expel any membrane fragments. If a portion of the maternal surface of the placenta is missing, it’s likely that placenta pieces are still in the uterus.
It can be dangerous for the mother if any parts of the placenta are left behind. She is at risk of postpartum hemorrhage and infection, because the uterus will not be able to contract completely. If you see anything protruding from the vagina or she continues to bleed, explain to the mother that you need to check inside her vagina. Wear sterile gloves and gently examine the upper vagina and cervix of the woman. Use a sponge forceps to remove any pieces of placenta or membrane that are present in the vagina. If you suspect the missing piece of placenta is still in the uterus, transfer the mother to have these pieces removed in a sterile manner by a trained health worker.
Remember, examine the maternal side of the placenta for completeness. Sometimes a piece can be left behind. Placenta pieces left inside the uterus can cause hemorrhage or infection.
Following the birth of a baby is a time of great responsibility for a birth attendant. You must safeguard the health of both mother and baby and help get the baby off to a good start in life. This video will show how to care for both the mother and baby right after birth.
Immediately after the birth, place the baby on his mother’s abdomen. Assess the baby as you thoroughly dry him with a clean cloth. The baby is well if he breathes easily, cries a few times, and moves actively. Be ready to resuscitate if the baby is not breathing within a minute of birth. If the baby is breathing normally, there is no need to suction the baby’s mouth and nose.
Change the wet cloth for a dry one and place the baby naked on his mother’s bare chest. This skin-to-skin contact keeps the baby at a perfect body temperature and helps establish successful breastfeeding. Keep the baby and mother covered. Feel the mother’s lower abdomen to be sure there is not another baby. Let the mother know you will give her medicine to prevent her from bleeding. Then give 10 units of oxytocin in her thigh muscle within a minute of the birth.
Delay cutting the cord until it has gone limp, after a few minutes. This gives the baby his full iron stores and prevents anemia. Clamp or tie the cord 2 finger widths away from the baby’s belly. Pinch the cord with your fingers and push the blood away from the baby. Two fingers widths away from the first clamp, clamp or tie again. Cut the cord with sterile scissors or a new blade. Do not put anything on the cord stump unless advised by your country’s policy. Leave it open to air.
Now turn your attention to the delivery of the placenta. Watch for signs that it has separated. You may see: a gush of blood, the cord lengthening, or feel the firm round uterus in the lower abdomen. The mother may deliver the placenta herself – or if it’s part of your training, you may carefully assist its delivery. When the next contraction comes, hold the uterus back with one hand while applying steady tension in a downward direction with the other hand. Never pull hard on the cord. As the placenta delivers, hold it in both hands and twist it to bring all the membranes together.
The main risk to the mother now is heavy bleeding. Check that the uterus feels hard. If there is bleeding, rub the uterus to help it contract and stop bleeding. Check it frequently to be sure it stays hard and there is almost no bleeding from the vagina. Inspect the placenta to be sure it’s completely intact and there are no missing pieces. Using good light, gently separate the labia and inspect the lower vagina and the perineum for tears. Suture if needed. Then gently cleanse the perineum and apply a clean pad.
In the first few hours after birth, try to ensure uninterrupted mother-baby contact to give the baby a chance to start breastfeeding. In this time the baby is in a special state of alertness and will find his mothers nipple if given the chance. Allow the baby to be at the mother’s breast for as long as he wants. Check the baby and mother every 15 minutes for the first hour, and every half hour thereafter. Be sure the baby is breathing well, his feet are warm, he has pink lips and normal activity. Check the cord for bleeding.
Take the mothers blood pressure, pulse, and temperature. Feel her uterus for firmness and check for bleeding. You can teach the mother how to feel her uterus and rub it to keep it firm. Her baby’s suckling also helps the uterus contract. Wait until the baby has had skin-to-skin contact for at least an hour before you provide other newborn care. Keep the baby with the mother. Give Vitamin K, preventative eye medication and vaccines if this care is part of your country’s practice. Wipe off any blood or meconium but don’t give a bath. A bath can make the newborn dangerously cold. Wait at least a day. Keep the baby warm when you weigh him.
Remember, place the baby skin-to-skin on the mother right after birth. Wait until the cord is limp before cutting it. Closely monitor the mother for bleeding and the baby for breathing and warmth.
Brought to you by Merck & Co, Inc., Rahway, NJ, USA (known as MSD outside the US and Canada) —dedicated to using leading-edge science to save and improve lives around the world. Learn more about the Merck Manuals and our commitment to Global Medical Knowledge.

Msd for mothers rio learning forum report 17 october 2018

Management of Normal Delivery - Gynecology and Obstetrics - Merck Manuals Professional Edition

Management of Spontaneous Vaginal Delivery - Gynecology and

Management of Normal Delivery - Gynecology and Obstetrics - Merck

MSD Manual Guide to Obstetrics on the App Store
MSD Manual Guide to Obstetrics by Merck Sharp & Dohme LLC
MSD Manual Guide to Obstetrics - APK Download for Android
Management of Spontaneous Vaginal Delivery
MSD Manual Guide to Obstetrics - APK Download for Android

Operative vaginal delivery Extraction methods

Clinical Pathology: Pregnancy: Terms and Clinical Considerations

Nursing (RN): Cervical & Uterine Pathologies - Endometriosis
Shoulder dystocia - Wikipedia